
Steel Design Briefs
A design brief is the name given to a design appended to a particular member within the Steel Design module. A design brief is made up of a series of design checks carried out on the member it is attached to. The design brief controls the type of design checks that are carried out within the design brief.
Within the Steel Design Module, a range of design briefs are provided. These Integrated Design Briefs are accessed through the Integrated Design menu within the MasterKey Steel top menu structure. The available design briefs are given a title which acts as a descriptor and so gives a description of the type of design checks that will be carried out in that type of design brief. Some design briefs will give a summary information, some briefs are applicable to all types of steel members and some briefs are intended only for use on certain types of steel member.
The following section gives a description of each of the available design briefs and the types of design checks available within each brief, as well as an overview of the use of each type of design brief.
Managing Design Briefs
Design briefs can be added through the MasterKey Steel module interface. Design briefs can also be added automatically to members by using the 📄 Steel and Composite Member Design Groups (Pro) functionality, accessed in Masterframe through the Design menu. This provides another method of adding design briefs to individual members, but also allows the user to group members for design purposes, to allow groups of members to be designed using the same design data and also to opt to assign a common section size to particular groupings of members. Whether design briefs are added to members individually in the MasterKey Steel module, or through the MasterFrame Design Groups, the design checks and options available for a type of brief are unchanged and the navigation and use of the briefs is unmodified. For further details on the use of Design Groups within MasterFrame, refer to the MasterFrame manual.
On entering the MasterKey: Steel module, the module will open on the brief 1. If no briefs have been created automatically or added, the left hand side pane will be blank. The screen layout is shown below, for a sample Beam and Beam-Portion brief attached to a secondary beam.
In the main graphics window, when the 3D view is not active, the members of a model are colour coded. Members which are shown in cyan have no steel design brief attached to them. This may be because a brief has not been added, or because the member is not a steel section i.e the member is either concrete, timber or a composite section.
Any members which have a steel design brief attached will show in black. The currently selected member will be shown in 3D and will show in red. In the above model, only 3 members currently have a steel design brief attached, with the current member having a Beam and Beam-Portion brief appended to it.
Applying A Design Brief to a Member
To apply a particular design brief to a particular member within the MasterKey: Steel module, the required design brief is selected using the Integrated Design menu. Using the mouse, click on the Integrated Design menu item to shown the expanded menu, as shown below.
.png)
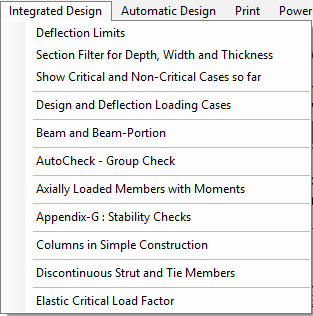
The required design brief is selected using the mouse pointer. Hover over the required menu item and select the brief by clicking with the left mouse button. The software will now automatically enter the Add/Remove Members mode and this will be reflected by the highlighting of the member. Now the member to add the design brief to can be selected graphically in the main graphics window. The MasterFrame navigation tools from the main icon menu can be used to filter to a particular view and/or member, to aid in navigating to the required member. Once the member is visible, it can be selected by hovering the mouse pointer over any part of the member and selecting by clicking on the left mouse button. Once a brief is assigned to a member, the member will highlight in the main graphics pane and the design pane will shown the design check of the particular design brief selected as they pertain to the selected member
Moving Design Briefs
A design brief applied to one member can be taken off that member and applied to another member of the frame. This is termed moving a brief from one member to another.
- While in Search for next brief mode ( icon selected) click on the member which contains the design brief that you wish to remove from that member and apply to another member.
- Change to Apply To mode by selecting the
 icon
icon - Using the mouse cursor, select the member to move the brief to by hovering the cursor over the member and selecting by left-clicking.
- Change back to Search mode by clicking on the icon, to avoid moving the design brief to other members you click on.
Add a new brief to a member by copying an existing brief
A design brief can be added to members by using an existing brief and copying that brief to the new member or members.
- Graphically select the member with the required design brief by using the mouse cursor to highlight the member in the graphical window. Ensure the member is highlighted and the calculations for this member appear in the results pane.
- With the mouse cursor, select the
 icon. The cursor will now change in the graphics window to two large red lines to (forming the cross-hair).
 - Using the graphical window navigation tools if necessary, select each member to have the design brief copied to it using the mouse by hovering the cursor over the member and left-clicking with the mouse.
- Once completed, exit the "copy to" mode by clicking on the
 icon.
icon.
When a design brief is copied to a new member the settings for that brief are also copied. For example, if a brief is set up with lateral restraints at particular positions, the lateral restraint positions will apply to the member it is copied to. Thus the copy-to mode allows briefs to be quickly applied to a number of similar members with the set up of the brief being also copied. However, care needs to be taken when copying a brief from one member to another where the same design parameters do not apply. For example, care needs to be taken if a brief for a member which is assumed to have full lateral restraint in lateral torsional buckling restraint is copied to members for which this assumption is not valid.
Navigating Design Briefs
Once design briefs have been assigned to members within a model, there are a number of ways in which it is possible to navigate through the design briefs and hence review the design results for the model.
Design Brief Dropdown
In the Section Auto Design tab, at the left hand side of the pane, the Design brief drop down allows access to any of the design briefs created and appended to a member of the model. To expand the drop down, use the mouse cursor to click on the drop down itself. The layout of the screen with the expanded design brief drop down is shown below. A brief is selected using the mouse.
Alternatively, the drop down can be navigated using the sort buttons .png) , or by using the
, or by using the
.png) search buttons.
search buttons.
When a design brief is displayed, the calculations in the design pane will update to reflect the design results for the selected member and the member itself will highlight in the graphics window.
Graphical Selection
On larger models, it may be time consuming to use the sort buttons to find the brief on any particular member, or it may be difficult to know which member a brief title is referring to. Therefore, it is also possible to display the design brief for a member by selecting the member itself in the graphics window. This can be done using the mouse cursor; move the mouse cursor over the member and left-click. To assist with locating a member in a model, the graphics navigation tools (📄 Filtered Views) of Masterframe can be used to filter the view in the graphics window. Alternatively, if member viewing groups have been created within Masterframe, these groups can also be selected using the
icons located at the bottom of the main window. The drop down allows the view to be amended be selecting the member viewing groups from the drop down. Additionally, the view can be filters using the.png) icons. Hover over each icon to get a tool-tip which explains each of these filters.
icons. Hover over each icon to get a tool-tip which explains each of these filters.
When searching graphically for a design brief, ensure that the icon is highlighter in the graphical pane.